Showing posts with label painterly. Show all posts

Sunday, February 26, 2017

Mobile Art Monday No. 56


Hope you don't mind as I stray far from my normal editing path. I've been watching a lot of painting videos lately. Jodi Ohl has gotten my total attention. Last week I went to the university book store and bought $150 worth of art supplies. They have a fabulous art department. (About the only thing missing is encaustic supplies.) I re-watched and painted on three at the same time to get some techniques down. They aren't quite finished, probably practice some more on them.

But, in the mean time.... I'd taken a photo of some oil paint left on my palette paper that I'd folded up and trashed. I needed to retrieve it to check a color and loved what I found when I opened it! So I had been playing with it in Superimpose, masking it over a textured background. This is what I ended up with that I decided to take into Procreate and have a play. It doesn't look anything like my finished piece, does it? You may be able to pick out a few light/dark areas is all.


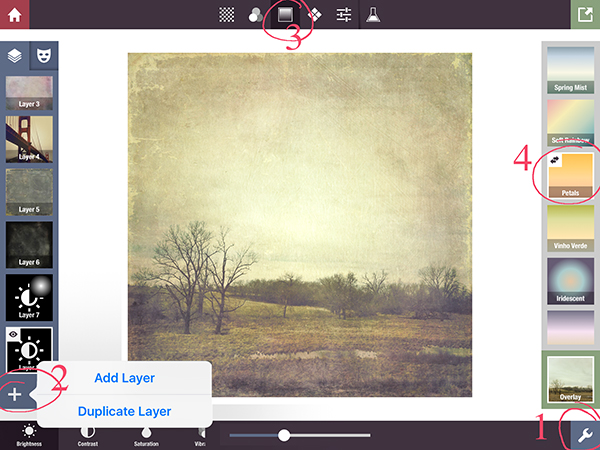
One thing I did that you can see from these layers, is that I duplicated that texture and set the second layer to exclusion. Then I added a lime green layer over it and set the blend mode to Add at 50%. This of course totally changed the color and got me excited. 

Here are a couple of in-progress shots.


I had picked a canvas sized 4000x3000 when I meant it to be square. That's why you are seeing brush marks beyond the edge of the image. I cropped after finishing.

Check this Vimeo link to see the fast motion 25 second video from Procreate.

Hope you're having a great Monday whether you're 'arting' or not.

If  you want to take a cool class, my friend friend Tricia Dewey is starting an iPad class Monday over at Ivy Newport's online class site. I think there may still be spots left... Figurescapes class.

Monday, January 23, 2017

Mobile Art Monday No. 53

While playing around in iColorama this week I discovered an interesting thing and just have to share!
Here is my workflow for this piece.

Like most of my edits I start in Snapseed for initial adjustments like Exposure, Ambiance and Tonal Contrast.
At this point I had only made the crop to use on it's own (which I did) but ended up using it in this edit later.

I imported the portrait format image into iColorama.
Style>Coherence>Preset 1 with opacity reduced about 50%. Check Apply.

Style>Tensor 5/5. This is what it looked like before changing any settings.

I chose the photo option at the bottom right To import the square Snapseed edit.
I adjusted the Amount slider all the way to the right which created an interesting offset mask. Saved to camera roll.


I then opened it in Stackables to get some color and texture in the image. (Download link for this formula is below.)

I felt like it was calling for some sketchy line drawing effects. Since I used the the square crop for the 'mask' I decided to use it also for the sketch. Back to iColorama.
Style>Edges Preset 1, reduced size for finer lines. Saved to camera roll.

I imported the Stackables edit and the sketch into Procreate to add in the sketch effect. The sketch layer was set to darken at 50%. It was chopped up into the separate flowers to get things lined up the way I wanted. A new layer was created to add more pencil lines to the piece. I saved this image to camera roll then imported it back in and set the blend mode to hard light and reduced the opacity to 61% for a more dramatic look.

Then in Snapseed I made a little tonal contrast. I have to decide if that tweak was worth it because I went from a 10MB png file from Procreate to a 2MB jpg from Snapseed. I'll have to consider this when I do some future printing.

Here is the link to the Coneflowers2017 Stackables formula. Check out the instructions at the end of Mobile Art Monday No.47 for adding formulas to your Stackables app.

Wishing everyone a great Mobile Art Monday!


Wednesday, December 21, 2016

Art Washes

December's digital art project is about fonts and text and making art and being creative.
After finishing this piece I really want to make a few more. I plan to have this printed on canvas for sure. I have a few quotes in mind...Now to go play some more.


Monday, June 20, 2016

Mobile Art Monday No.46, iColorama Recipe


I found that an image with some texture works best for this recipe as I experimented on different photos. For example, NOT an image with a lot of plain blue sky. Although on the one I attempted from my garden ended up in Stackables for some more editing and turned out pretty cool.

My initial edits were done in Snapseed for basic adjustments, plus I boosted the Structure for more grittiness and crispness. You can do this in iColorama also under the Adjust Menu. Do your basic adjustments, clicking APPLY after each, then for the extra clarity Adjust>HDR>Preset 2/8, Opacity .30. Check APPLY.

Sunflowers on Chair Recipe

Load your photo if you haven't already done so.

original (edited in Snapseed)

1. Style> Edges> Preset 1/19 Overlay, Size .55. DO NOT APPLY, SAVE THIS OUTLINE VERSION TO CAMERA ROLL.

2. Style> Simplify> Preset 12/17, Opacity .74. APPLY


Style> Sketch> Preset 12/12, Opacity .44. APPLY

Now we want to add our outline version to blend in over the previous.
Effects> Blend> click Photo at the bottom right corner. Choose your outline version from your camera roll. 

It's loaded.

Preset Overlay, Opacity .40. APPLY

You may like the tone of your photo just fine but I decided to change mine.
Adjust> Tonelab> preset 8/14, Lightness .40, Opacity .75 (choose one that works for your photo)


Tip.....
iColorama has a history panel of sorts. So if you accidently hit Apply in step no. 2... 
In the upper left corner click on Steps and choose the step before it. Then you can proceed.

Here are two more edits I did with perhaps a few variations.


Have a great Mobile Art Monday!


Monday, April 11, 2016

Mobile Art Monday No. 43

Five of my regularly visited apps were used in this edit. 

The original...

The first, Retouch to "mess" up the background and get rid of the extra flower.

The second, Snapseed for general tweets and a little vintage filter.

Third, Repix to "paint" the background. (Use the eraser brush to take brush marks off the flower.)

Fourth, in iColorama I did three edits.
Style>Coherence with these settings.

Style>Sketch with these settings.

And Style>Water with these settings.


The into Stackables for texture and brightening.

Hope you've had a great Mobile Art Monday!


Monday, February 1, 2016

Mobile Art Monday No. 39

So far this is my favorite mobile art piece this year.

It is a collage of these two photos.

I cropped and edited the barn in Snapseed. This app always amazes me. She was also edited to tone down the highlights and lighten the shadows. I used Retouch to clone out the gray barn.
Then I opened it in Leonardo and added the girl photo on a new layer. She was carefully masked away from her background. It was a bit difficult to try and 'paint' in a shadow on a new layer underneath her but I knew it wouldn't need to be perfect.

Next, into Distressedfx for a flock of birds. I reduced the opacity a bit. In fact Distressedfx owner, Cheryl Tarrant asked to show this image on her website as it's undergoing some updating.
Then off to Brushstroke for a slight painterly effect using brush effect S3.

By now you know Stackables is one of my favorite apps. 

After a little play around I came up with this formula. You can save it to your Stackables app and use it on your images. Down load 'Rural Life' from this link and save it to your Dropbox. 
Now on your device, open Dropbox and click the file. Use the 'Open in' option and choose Stackables. It will ask if you want to import the formula, tap 'Import'. 

You will find it under the formula image with the heart. Click on the formula to apply it, then the wrench icon to make any changes you like.
This formula is not 'yellow' like my image appears so if you need to add some warmth, click on the add layer, click the third icon and choose 'Petals'.

This is the landscape using the original formula without 'petals'.

I'll leave you with another Stackables version that I liked.

Hope you're having a great Mobile Art Monday.


Monday, October 5, 2015

Mobile Art Monday No. 35


I've been taking a class called Paint and Pixels given by Ivy Newport and Robin Laws. The first three weeks have been all digital art although drawing in the Procreate app has been a stretch to someone not used to 'hands on' art. This week, week three, is combining digital with real paint and charcoal and who knows what. I haven't watched all the videos yet but I can tell you right now I'm seriously chickening out when it comes to hands on. I have all the tools, I just don't know how to use them. It will totally be trial and error with lots of error I'm sure since there is no undo button!
One of our lessons was a composite. I've done a few in the past never really being happy with them but with my new found knowledge, I must revisit some of those old digital files on the cutting room floor.
I used five of my own photos. The house photo is the main photo. The fence piece as masked in. The bird I had already extracted from the background and saved as png file. The moon, from last week. I played with just those 4, then decided something needed to be in the foreground. 
Pretty ugly right? I use Leonardo for layering my work. If one layer doesn't blend well, it can be adjusted which I had to do with the fence. Changed the exposure and contrast. You can barely tell where the sky met on the two photos. I also like it's masking abilities.

Next up Brushstroke for a painterly effect.
Now that's looking better already.

Now one of my all time favorite apps, Stackables, which has had an update and a few new textures and things. If you own the Master pack, the update is free. If you don't, you should get it!
I actually saved several versions but this was my favorite.

I then took it into Procreate and added the chimney, smoke and some line art for my finished piece.

Have you stepped out of your comfort zone lately? This is definitely not my normal work but it was fun and I've incorporated it into some still life photos and love the results.
Check out my Instagram for more art. Oh, and if you're a Hipstamatic user, join us on Instagram with the hashtag #hipstaaday_october. Some of us got hooked last month and it's a great way to experiment with some different combos. (be sure to post your combos)